
Betty’s Pie Whole
May 21, 2015 § Leave a comment

We recently stopped by Betty’s Pie Whole for a quick bite to eat. We could have easily stopped by Elizabethan Desserts just a ways up on El Camino Real (both in Encinitas) but we wanted savory pies for lunch. The two are sister shops so we could get some sweet pies too while at Betty’s.
Ah, pies. Delicious pies. Fills me with warmth and giddiness. It also reminds me of Cartman and his infinite wisdom of how little men should deal with women.
Moving on. In a fit of hunger, we ate the Mama Jo’s Meatball Pie and Grandma’s Chicken Pie before I realized I forgotten to take pictures. Like you’ve never done that before. You haven’t? Well then, bite me. We ordered the individual pies which didn’t have the beautiful lattice crusts as the whole pies pictured on their website. However, the individual pies were cute in their own ways and quite filling. We were surprised as to how full we were afterwards.
If you grew up eating Swanson’s frozen chicken pot pie (like me) or Marie Calendar’s pot pie (me also), then Grandma’s pie will be a new experience. The crust is not flaky like the commercial ones but still good and very well seasoned. I enjoyed this variation. The filling was creamy and flavorful, good amount of chunk chicken to go along with the standard carrots and peas. The thing I dislike about almost all chicken pot pies is the underlying crust. More often than not, it’s soggy and can seem like it’s not cooked through completely. Grandma’s Pie was no different in this aspect. Would I get it again? If I was there and in a mood for chicken pot pie, yes.
The Meatball Pie was the star of this lunch. I really do wish I had taken a picture of this one because the top crust had little crispy spikes, almost meringue-like, and there was a delicious seasoning on top of it. The turkey meatballs were tender and went well with the homemade marinara sauce. I had forgotten to tell the Mister that the meatballs were made from turkey. Good thing since he is not fond of ground turkey. Uh, I still haven’t told him but since he said he would definitely order it again, I don’t think he would mind.
Since we were there after the lunch hour, the selection of sweet pies were not as plentiful but they did have a couple of pies that I wanted. We got three individuals to go.: Coconut Cream, Apple Crumbly and the Milky Way. The gal behind the counter stored these aside for us while we ate our savory pie. Good thing because I got the last of all three.


Clockwise from bottom left: Milky Way, Coconut Cream, Apple Crumbly
Betty’s website doesn’t list the Milky Way Pie but you can see the pie description here. The Mister likes Milky Way candy bars so this was his choice. I’m not a cookie crust fan so this one was not my favorite. I found it to be too hard. The chocolate filling and toppings were pretty good though.
The Apple Crumbly was pretty good. The apple slices were on the thicker side and still had some tooth to it, which I like. I didn’t find it overly sweet, which some people have said on their blogs. The crust was decent and had good flavor. The Mister is not a big fan of crumble anything so this was my choice. In hind sight, I really should have gotten the Strawberry Rhubarb Pie instead since I wanted to get pies we’ve never tried before. Next time.
I picked the third pie (coconut cream) for the Mister since he loves coconut cream pies. But what was supposed to be something delectable for him turned into a new love for me. As the meatball pie was the star of lunch, the Coconut Cream Pie was the star of dessert. You don’t have to clean out your ears (or maybe you do, I don’t want to know about anyone’s hygiene issues). But yes! I said the “Coconut” cream pie was the star. For those who don’t know, I’m not a big fan of shredded coconut. Love coconut water. Love coconut cream. Dislike coconut meat and any form of it. So understand just how good this pie had to be in order for me to love it so much.

What’s to love? First, the crust is buttery and flaky, one of the lightest crusts I’ve ever had. A perfect crust in my book.
Second, the coconut cream filling is also the lightest cream I’ve ever had. Lightness that I can only dream of achieving in my own cream pies. A bite of this pie just melted in my mouth because it was so light. The Mister did give his “mmmm” approval, no surprise there. but the surprise is me and how much I love this pie. So much that I’ve been thinking about it non-stop since. Yes, non-stop. The Mister would be nodding his head and rolling his eyes. Just yesterday I was asking, “Should I drive up and get a whole pie? Should I? Should I?” Memorial weekend is just a day away, you know. Hmm, they won’t be open for another couple of hours but Elizabethan is open so if I left now………….
P.S. Elizabethan don’t usually carry whole pies, just individual pies.
Betty’s Pie Whole
(located inside Sunshine Gardens under the red roof building)
155 Quail Garden Dr. Encinitas, CA 92024
760-230-6781
Hours:
SUNDAY 10:00 am – 6:00 pm
MONDAY 11:00 am – 8:00 pm
TUESDAY 11:00 am – 8:00 pm
WEDNESDAY 11:00 am – 8:00 pm
THURSDAY 11:00 am – 8:00 pm
FRIDAY 11:00 am – 8:00 pm
SATURDAY 10:00 am – 8:00 pm
Cocozia 100% Organic Coconut Water
November 18, 2014 § Leave a comment

A few weeks ago, Cocozia offered me a chance to taste their coconut water (here) to review. we’ve never heard of Cocozia’s brand before so we were eager to try it. We’ve had several other brands but there’s (ahem) one in particular that the Mister always seems to get. So here you’ll be getting both our takes on Cocozia.
Let’s start by summarizing each of our view of coconut water. The Mister doesn’t like the taste of coconut water. I won’t quote what he has compared the taste of it to in the past but let’s just say he drinks it as a “necessary evil.” Meaning he drinks it for the health benefits, not for the taste. He actually prefers to drink the flavored ones.
I prefer the straight coconut water or the fruit flavored ones. I can’t stand the taste of the chocolate or other weirdly flavored ones. Yuk!
On first look, Cocozia has a nice clean container, the green probably representing the organic and Non GMO side of the product. There’s a straw for convenience which I liked very much. Also Cocozia is kosher so another brand option for those who need kosher.
Now the taste. (You know it’s all about the taste, about the taste, no treble) Sorry Meghan Trainor, couldn’t help myself. We bit found Cocozia a bit less sweeter than some other brands, which actually is good if you want to use coconut water for cooking or baking. I didn’t detect any weird metallic aftertaste that I’ve noticed in a couple of other brands. It is a nice clean taste. The Mister said it was a bit more palatable than the other brands. For someone who doesn’t care for the taste of coconut water in general, that’s a positive. As a matter of fact, he’s been drinking it straight before bedtime.
I’ve used it in my pineapple-mango-spinach-Pom juice smoothies and I don’t really taste the coconut water at all. But then pineapple and mango can mask a lot of flavors. I’ve even tried making a batch of mini coconut cupcakes using it instead of milk. The texture was on the dry side since I didn’t compensate for enough fat in the recipe so I’ll be trying that again. I did, however, use it in a simple icing I used on a store bought bunds cake that someone gave me. I mixed about 3:1 part of powdered sugar to coconut water. Mix well then drizzled over the bundt cake. Sorry no pictures but I had people over and it was a bit crazy. It was a hit though, no cake left.
The only drawback is that Cocozia is on the higher end of the price spectrum of coconut waters. I haven’t seen it in stores so to get it from Amazon (here), expect to pay just above $2 per container. You can get it in a case of 24 or larger containers, too. If all the brands we like were layed out in front of us and asked to choose one, I honestly would pick the cheapest one, assuming I’m paying for it. Hey I never said I wasn’t cheap. But I would stock up on Cocozia if it was on sale.
Cheesecake Redux
September 24, 2014 § 8 Comments

Holy bat cheese it’s been almost 7 years since I posted the original cheesecake recipe. As much as I still love the original recipe, the height of the baked delight always seemed a bit “short.” Not necessarily flat but I thought a bit more height would make it even prettier. But in order to do this, I would either need to buy a new 8″ springform pan or continue to use my 9″ pan and increase the cheesecake mixture. Since I rather have more cheesecake to eat, I chose the latter. Like uh, duh, surprises anyone??
The reduxed recipe is similar to the original recipe but now it includes sour cream and lemon zest. With the addition of sour cream into the cheese mixture, this is more along the line of a NY style cheesecake, which the Mister loves. The lemon zest just makes any cheese baked goods that much yummier.
Since this is a much taller cake, I highly recommend using a water bath. But if you’re bold and don’t care risking the top of your cheesecake crack, then just bake it without it.
Now different people have different preference as to how “silky” they like their cheesecake. I like mine to have a bit of firmness but still have a slight silky texture. I don’t like really creamy or silky cheesecakes. Also NY style cheesecake really shouldn’t have any browning on top.
The amount of time depends on your oven, the size of pan you use and whether a water bath is used. Depending on you preference, I recommend start checking your cake around the 35-40 minute of baking for doneness. The correct timing is usually before you think it’s ready to come out of the oven. The center of the cheesecake is still a bit jiggly, like it’s not quite set. The cheesecake will continue to cook when its resting in the water bath after you pull it out of the oven.
NOTE: always be very careful when moving the pan when using a water bath. Don’t want to get any water into the cheesecake!
Once cooled, the top will be perfect with no cracks. If the top cracks, then reduce the baking time the next go around. I’m sure it’ll still be very good, just might be a bit firmer or tougher than you might like it. If it was me, I’d rather have it error on the silky side than overbaked side any day.
Also make sure the cream cheese and the eggs are at room temperature before making the filling. This will ensure the proper texture.
Ingredients for crust:
2 C graham cracker crumbs
2 tablespoons sugar
1 teaspoon ground cinnamon
1 stick (4 oz) unsalted butter, melted, plus a little more to butter the pan
pinch of salt
Ingredients for filling:
4 packages (8 oz ea.) cream cheese, room temperature
1 1/4 C sugar
4 large eggs, room temperature
1 teaspoon real vanilla extract
Instructions:
Preheat oven at 350 degrees F.
Mix together graham cracker crumbs, 2 tablespoon sugar and cinnamon in a bowl. Use a whisk to incorporate everything. Add melter butter and mix until well combined. butter the bottom and side of the springform pan. Press mixture onto bottom and up the side of a 9-inch springform pan. The crust should go up about an inch or so of the pan. I use a ramekin to get the bottom flat and a measuring cup to press it against the side of the pan.
Ready to bake! As a side note, you can actually skip the prebake part and it’ll be just fine. If you use an unbaked crust, put it in the fridge for 10 minutes to prevent crumbling when you pour the cheese mixture in. Bake for 8 minutes, set aside to cool.
Beat cream cheese on low speed until creamy and there are no more lumps. Add sugar gradually and beat well. Add eggs one at a time, beating well after each addition. I always scrape the bowl after each egg to ensure that there’s no lumps of cheese stuck to the side of the bowl. Add vanilla and zest.
Before pouring the filling into the crust, prepare the outside of the pan by placing a large piece of aluminum foil underneath the pan. Then fold it up along the outside of the pan. Tuck or rip off excess foil.
Now pour the filling mixture into the center of the pan slowly. Then gently smooth the top of the filling so that it’s level. The filling should be higher than the crust on the side of the pan. I have so the crust is just below the top of the filling line (whew!). Okay, ready for baking!
To prepare the water bath, fill a large roasting pan with about 1 1/2″ of very hot water. The water line should come half way up the springform pan. I do this step on the middle oven rack since I don’t like to carry a full pan of hot water. Se the springform pan into the middle of the roasting pan. Carefully and gently slide the oven rack back into the oven.
Bake at 35o degrees for 45-50 minutes but check firmness starting around the 35-minute mark. Give the pan an ever so slight wiggle to see how much jiggle the cheesecake has. (Get jiggy with it dances around in my head about now.) The jiggle should start about half way in from the side. If not, bake for another 10 minutes and check again.
Click here to see what the jiggle looks like for a silky texture. Notice how the jiggle is fairly close to the edge of the pan? If you’re like me, I prefer it to have a bit more texture (less silky) so I take it out when the cheesecake jiggle is only about half way out from the center. Does that make sense?? If not, leave a comment and I’ll try to explain it better.
Once there is only jiggle in the middle to center portion of the cheesecake, carefully pull the entire roasting pan out of the oven. Leave the springform pan in the water bath for 30 more minutes.
Remove springform pan and cool on a rack, which helps prevent the crumb crust from getting soggy. Chill in the fridge for at least 4 hours before serving. Add your favorite topping as you like it.

Pappalecco Cafe – Little Italy
July 19, 2014 § 4 Comments
This morning was full of errands, one of which was stopping by the Little Italy Farmers Market to pick up our 50 pound order of meat (that’s what she sai…uh…never mind) from Da-Le Ranch (Hi Ashile and Aleya!). We usually do this every few months. This morning, we decided to go a bit earlier to have some breakfast and hopefully to have an easier time with parking. Scored on both! I had 2 places in mind and left the final decision to the Mister. He chose Pappalecco Cafe since he’s always wanted to try the one by his work (Point Loma location). The Little Italy location was perfect for this trip since it’s just a block away from the Farmers Market.
Even though we had coffee at home, I wasn’t going to let the opportunity of having freshly made espresso pass me by. No sirree. The cafe is fairly small, 5 2-seaters inside and more seating outside. There was a line going out the door mainly because it was kind of narrow inside and one small door where all traffic (humans and apparently canines) go in and out. Didn’t take long for us to get up to the counter though.
The Mister just ordered his standard Americano, black. I decided to go with a Macchiato. For Starbucks patrons, this is not quite the same as their macchiatos, which are more of a latte macchiatto (milk spotted with coffee). A traditional Italian macchiato (also known as esspresso macchiato) is a shot (or double) of espresso with a bit of milk (coffee spotted with milk). BTW, Pappalecco offeres a variety of milks to choose from, I chose almond milk with mine. But you can also choose soy milk, nonfat milk as well as regular milk, whipped cream and syrup.

Even though we were eating there, we had our coffees in to-go cups. Here’s what my macchiato looked like in the regular cup. It was actually perfect for me.
The Mister had already decided the night before on the Classico breakfast: eggs (your way), grilled ham, fresh mozzarella, mixed green salad with an option to add a side of “Tuscan Style” potatoes, which he did of course.

I loved the mixed green salad and the balsamic vinegar that came with it. I think I ate half of them. Now the side of potatoes might look kind of plain in the picture but they were delicious, crispy on the outside and soft on the inside, great flavor too. The Mister really enjoyed this.
I had a tougher time selecting but decided to keep it simple and went with the ham and cheese croissant, warmed. Very good, the croissant was flaky and it went well with the Mister’s mixed greens, hehe,
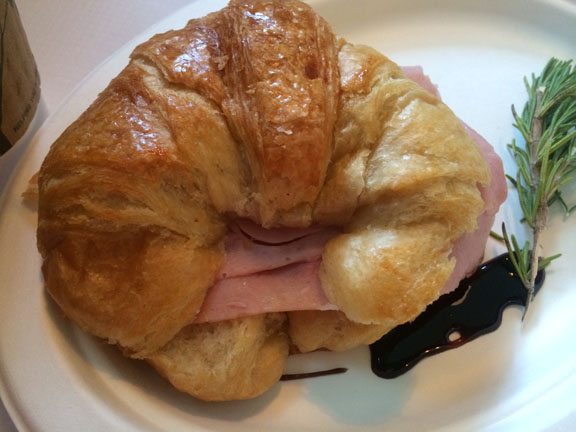
Notice on the bottom right of croissant is a smear of balsamic vinegar. It was pretty thick so I think it might have been reduced a bit, was really good with everything. I would certainly have this again and most likely add my own potatoes and mixed greens next time. Yes, we are definitely coming back the next time we are in the area. Must come back just for the gelato if not for anything else.
Speaking of gelato, since it was so early in the morning, I didn’t get any but here are some snaps of the gelato case. They looked soooo good and I love gelato.

The very pretty lady behind the counter, yes, the one with the blue hair and pink glasses, was very nice. She greeted everyone with a ciao and how are you. Chatted with every customer and explained where everything was for new customers like us. Let’s have a closer look at some of the gelato flavors, shall we? Service was efficient and fast.


I am very curious as to what the cinnamon roll gelato taste like, just cinnamon or actually like a cinnamon roll?!?
There were other pastries and cookies too but it was too hard to get pictures of those since it was right behind the ordering line. Cannolis, puff pastries, various thumbprint biscotties, chocolate chip cookies and a few other things. You can check out the online menu on their website but know that it is not a comprehensive list of everything they have on any particular day. Also check their website for the other 2 locations in Point Loma and Hillcrest.
Pappalecco – Little Italy
1602 State St. San Diego, CA 92101
Phone: 619-238-4590
Korean Fried Wings (Dakgangjeong Maangchi’s Way)
June 15, 2014 § 6 Comments

I love fried chicken wings, so much that I can eat it every day. No, really, I think I can truly eat fried chicken wings every day. I’ve been takoyaki’ed out, hell, even bbq”ed out (crazy right?). But I have never said in my life, “Okay, I’m done with wings for a while.” Never. Ever. As a matter of fact, I crave those damn things all the time.
So no surprise that new fried wings recipes are always on the top of my “to try” list. And I think I have more fried wings recipe posts than anything else. The latest wings recipe that’s found a solid, and most likely permanent, place in the recipe binder is Maangchi’s Dakgangjeong recipe. You can check out Maangchi’s website for an instruction video as well as many more delicious Korean recipes.
Let me describe these wings short and sweet. They are like crack-addictive delicious. Can’t get enough, eat ’til your guts bust but you’ll keep eating addictive. That pretty much sums up my feelings about these.
I’ve adjusted the recipe according to my taste. I do like them a little on the spicier side so adjust to your own taste. I like to use Thai chili if I have them with a bit of gochugaru, Korean hot pepper flakes. I found that using ground ginger works better since it’s dry coated. But use sparingly if you’re not too into the ginger taste.
Don’t know what to make for Father’s Day? Try this and it’ll surely be a Happy Father’s Day.”
Adapted from Maangchi Crispy and Crunchy Fried Wings
Ingredients:
- approx. 3 pounds chicken wings, cut into individual sections, about 24 pieces (no wing tips)
- 1/2 teaspoon salt
- 1/2 teaspoon ground black pepper
- 1/2 teaspoon gochugaru (optional)
- 1/4 teaspoon ground ginger (or 1 teaspoon minced ginger)
- 2/3 cup corn starch
- 1/3 cup peanuts (optional)
- 4 cloves garlic, minced (more if you’re like me)
- 3 to 4 large dried red chili peppers, seeded, cut crosswise into ⅓ inch pieces (optional, or 1 teaspoon chili flakes)
- 1/4 cup soy sauce
- 1/2 cup corn syrup (or Korean rice syrup)
- 1 tablespoon white vinegar
- 1 tablespoon mustard (classic mustard works fine. Can use dry mustard but only use 1/2 teaspoon)
- 1 tablespoon brown sugar
- 1 tablespoon sesame seeds (optional)
- vegetable oil for frying
Directions:
- Pat wings dry with paper towels.
- Put the chicken in a bowl and mix with salt, ginger, ground black pepper and gochugaru (if using). Rub it all in.
- Put corn starch in a bowl and dip each wing in the starch to coat it, one by one. Squeeze each wing to press the coating to it tightly.
- Put 4 cups of cooking oil in a frying pan or heavy pot. Heat over high heat until it reaches 350 degrees F. I’ve gone as high as 375 and as low as 335 with no problem. If you don’t have a thermometer, you can test the oil by dipping a test wing into the oil, carefully. If the oil bubbles, it’s hot enough to start frying.
- Slide the coated wings one by one into the hot oil and cook for about 10 to 12 minutes, turning over a few times with tongs. I find that the wings cook faster when the pot isn’t crowded.
- Take the wings out of the oil and drain for a bit in a strainer. Turn off the heat, and let the wings sit for a few minutes. Make the sauce now (see below).
- Reheat the oil and fry the wings again for another 10 minutes until they all look golden brown and feel super crunchy through the tongs. Shorter time for smaller wings.
- When the chicken is done, reheat the sauce, if needed, until it bubbles. Remove from heat.
- Add the hot chicken and mix well with a wooden spoon to coat. I find doing the coating in a large mixing bowl is easier.
- Transfer to a large platter. Sprinkle some sesame seeds over top and serve immediately.
For the sauce:
- Heat a large non-stick skillet or wok over medium high heat. Add 2 tablespoons cooking oil, minced garlic, and dried red chili pepper.
- Stir with a wooden spoon until fragrant for about 30 seconds.
- Add soy sauce, rice syrup, vinegar and mustard. Stir with a wooden spoon and let it bubble for a few minutes.
- Add the brown sugar and continue stirring. Remove from the heat. Set aside.


